Mostrando las entradas con la etiqueta Técnicas/Techniques. Mostrar todas las entradas

jueves, 8 de junio de 2023

Mermay 2023: A coloring along

 Esta fue la imagen elegida para el mes de las sirenas. Pueden seguir el proceso en tiempo real en el canal de YouTube. Cada domingo se estrena un video relacionado con dibujo o colores.

———————————————————

This was the image I chose for Mermay. You can watch the process on YouTube. Every Sunday, there’s a video premiere related to coloring or drawing.


jueves, 13 de abril de 2023

Nuevas aventuras en arte e ilustración. // New Adventures in art and illustration

 Luego de cuatro años de adaptación a un nuevo lugar, trabajo, condiciones de vida, estoy lista para iniciar una nueva aventura con comisiones sencillas. 

En las siguientes semanas estaré subiendo pequeñas muestras de trabajo de este último año 2022 y algunas otras nuevas como promoción.

Espero les guste.


After four years of adaptation to a new place, work and life conditions, I am ready to start a new adventure with easy commissions.

In the next weeks, I will be uploading some samples of the art and coloring done in 2022, and some other samples as promotion pieces.

I hope you like the change.


sábado, 11 de febrero de 2017

Técnica nueva: Grabado / New technique: scoring

Esta es una técnica muy útil para hacer texturas en papeles o cartulinas gruesas. Se requiere de una herramienta con punta redonda y listo. Puede utilizarse una pluma que ya no tenga tinta.

Les dejo la liga la video que explica la forma de grabar y luego de poner lápiz de color para resaltar el grabado.
________________________________________________________________________

This is a very useful technique for textures on thick paper or cardboard. All you need is a round tip tool. You can use an old ballpoint pen for the same effect.

Here you have the video link with the explanation on how to use the tool and add color pencil to enhance the scored section.

https://www.youtube.com/watch?v=dpimIHKh0R0&t=1s

jueves, 29 de diciembre de 2016

Nochebuenas /Poinsettias

En el canal de YouTube siguen los tutoriales del libro Gatos y Flores. Esta serie está dedicada a las nochebuenas.

Aquí les dejo la liga al último video.

_________________________________________________________________________________
On the YouTube channel the tutorials from the book Gatos y Flores are updated. This particular series is dedicated to poinsettias.

Here is the link to the latest video.

https://www.youtube.com/watch?v=yRRVgJ8_geM


domingo, 18 de diciembre de 2016

Tutorial: Nochebuena en el libro Gatos y Flores / Poinsettia tutorial from the book Gatos y Flores.

Tuve unas dos semanas muy pesadas con exámenes finales en ambas escuelas y, una certificación de Cambrigde (CAE) que tuve que presentar yo misma. Añado que tuve que ir al hospital oftalmológico por un problema en mis ojos... tiempos difíciles.

Aquí tienen una liga al primer tutorial de mi libro Gatos y Flores. Es tiempo de Navidad, así que serán unas flores de Nochebuena híbridas las que serán coloreadas. ¡Espero les guste!
______________________________________________________________________________

I had a difficult week with final exams at the school and a CAE certification that I had to take myself. Adding to this was a hospital visit due to an eye problem... tough times.

You have here a link to my youtube channel with the first tutorial of my book Gatos y Flores. It's X-mas time so a hybrid Poinsettia will be colored. I hope you like it!

https://www.youtube.com/watch?v=dDvWBpuBOtc

jueves, 8 de diciembre de 2016

Vista: My libro para colorear/ Flipthrough: My own coloring book


He decidido hacer un video corto donde se ven todas las imágenes que están en el libro y la información de las plantas y flores que las acompañan. El libro es impreso en cartulina opalina, no hay versión electrónica o en inglés de momento. Esto requiere de más tiempo para preparar las traducciones y los registros correspondientes.

El precio de venta será de: 200 pesos y hay opción de mandarlo por correo certificado en México, y paquetería internacional si lo desean. Necesitarían dejar en la caja de mensajes su código postal y ciudad para cotizar el precio del envío.

Espero que les guste el libro, lo adquieran directamente conmigo (no está a la venta en ninguna tienda de libros), Espero que sigan en este blog los tutoriales que estaré haciendo para las páginas de mi libro.
_____________________________________________________________________________


I've decided to shoot a short video where you can see all the images and the information on each plant and flower depicted (only in Spanish). The material is printed on special carboard so any technique can be used. There is no e-book or English version available at the moment. This versions will require a bit more work for the next year. As different registrations and certificates are needed.

The price will be: 200 Mexican Pesos, and there is option to send it by certified mail. in Mexico There will be shipping options to other parts of the world if desired. Postal codes and cities might be needed to calculate shipping, so you can leave a message here.

I hope you like the book and that you have got the chnace to buy it directly with me (It is not available right now at bookstores in Mexico). I invite you to follow this blog for the tutorials I will be posting on coloring some pages of my book.

martes, 8 de noviembre de 2016

Tutorial Lost Ocean.

Esta vez, elegí una paleta de color con azules, verdes y grises. Los colores iniciales fueron los siguientes:

This time I chose a color palette with blue, green and grey. The initial colors were these:


______________________________________________________________________________
Empieza con las secciones más grandes con un color claro, este es PC aquamarine. Luego con uno un poco más oscuro que el anterior para colorear otras zonas adyacentes.

Start with the biggest section with a light color, this is PC aquamarine. Then with another darker shade color adjacent color sections.


_______________________________________________________________________________
Después de aplicar los colores, noté que las lineas y los detalles eran demasiado pequeños para seguir aplicando color; así que añadí a la paleta de color plumones de punta delgada. Estos son Maped Color Peps y Stabilo. A tu gusto colorea los detalles y deja zonas en blanco. Es un error no considerar el blanco de las hojas como un color para combinar con tu paleta de colores.

After laying down the colors, I noticed that the lines and details in the drawing were too small for color pencils like the ones I was using, so I decided to add felt pens. These are Maped Color Peps and Stabilo. Decide the sections you want to color using felt pens and leave some areas in white, It is a mistake not to use the white paper as a color as it is another option that combines with your color palette.


_________________________________________________________________________________
Una vez terminado el dibujo, es hora de pasar al fondo. Para este fondo utilicé únicamente colores Derwent. Los tres colores son: azul oscuro, medio y claro.
Hay que aplicar primero el color oscuro en manera suave y en capas, luego el tono medio, y al último el tono más claro. Para suavizar el degradado, usé un poco de algodón y mezclé las tres capas con movimientos suaves y circulares.

Once the line art is done, it's time to color the background. For this I used only Derwent color pencils. The colors are: dark, medium and light blue.
Lay the dark blue first, then the midtone and finally the light blue. Use soft movements and try to work in layers. To soften the ombre effect that you created, use a cotton swab. Try to use gentle and soft circular movements to blend the colors.


Espero les haya gustado el resultado.

I hope you liked the result.

miércoles, 2 de noviembre de 2016

Bullet Journal / Planner

Tengo varios proyectos de coloreado en proceso, en diferentes libros que he comprado (y los que me faltan por llegar en la próxima semana). También tengo pendiente un registro ISBN que está por concluirse este mes y que al fin me permitirá auto-publicar mi propio libro para colorear. No me dedico a dibujar o ilustrar, ni siquiera colorear, para obtener un sueldo. Mi modus vivendi es la docencia: por lo que los videos, las entradas aquí y las clases que doy tienen que organizarse de manera perfecta.

Por lo anterior, decidí comprar un planeador de actividades o una agenda física (he intentado con el ipad y no me ajusto). Vi muchos modelos y no me gustaron. Luego vi la sugerencia de hacer un bullet journal y me agradó la idea de complementarlo como un planeador. Así que manos a la obra: conseguí un cuaderno journal en blanco y a planear el diseño de manera espontánea y como vayan surgiendo las ideas.

Estas fotos representan el diseño base, aún no hay muchos colores en las páginas ni diseños con plumas de gel. Se los pongo para que se den una idea de lo que puede hacer con una hoja en blanco, y que es un reto creativo. Una vez que termine el mes de noviembre pondré un video en mi canal donde se vean ya las páginas terminadas.
_______________________________________________________________________________

I have several projects going on using different coloring books (and yet, I am missing the ones I've just recently bought for next week). I also have my ISBN number pending in order to self-publish my own coloring book this month. I do not have a paid job as an artist or colorist, believe it or not I am an educator and that is my modus vivendi. That's the reason why all my activities need to be perfectly organized.

I wanted a planner or a diary to organize everything I need to do, but the ones I saw didn't convince me much. Then I saw the bullet journal option, and I thought about complementing it as planner. So, I got a journal with white pages and I started the basic design, as spontaneous as I could.

These pics are the basic designs of the pages, no color, no gel pens. This is for you to get an idea on what to do with a blank page and start the creatuve challenge to start from scratch. Once November is due I will make a video for my youtube channel to let you see the finished pages of the month.


miércoles, 12 de octubre de 2016

Coloreando sobre imágenes en tonos grises / Coloring on grayscale images

Para muchos tomar una imagen en tonos grises y colorear, no tiene mucho chiste. La verdad es que si se hace bien el experimento se puede aprender mucho de sombras y luces. Este va a ser el experimento de esta semana. No habrá tutorial en video pues tengo pendientes otros dos y hay que terminarlos.

La imagen elegida es de mi propia autoría en un viaje realizado a San Miguel de Allende, Guanajuato en México. La imagen es de la catedral. Aquí se ve la foto original y la ya tratada en tonos grises. Conforme vaya avanzando el coloreado iré actualizando la entrada de este blog para que vean el proceso completo,

Semana de exámenes en las dos escuelas. No se pudo avanzar mucho de esa imagen. Actualizo al final las fotos de los dos archivos en tonos gris que estoy trabajando.

Más fotos del proceso. En este momento estoy comenzando con el cielo.
________________________________________________________________________________

For some people coloring a grayscale image is not really interesting. The truth is that if the experiment is done well, you can learn a lof about shadow and light. This is going to be the experiment of the week. No video tutorial on this image as I have other two pending to finish.

The chosen image is the photo I took  during a trip to San Miguel de Allende in Guanajuato, Mexico. The image is from the cathedral. You are able to see the original photo and the grayscale one that I prepared to color. As I am coloring I will update this post for you to see the complete process.

Exam week at school. Little time to color. Here is the update with the files I am working on.

More fotos of the process. Right now I am starting the background.


Close up:


domingo, 9 de octubre de 2016

Colorea Conmigo / Color Along

Normalmente no me agrada estar viendo videos en YouTube de más de veinte minutos. Me parece que no utiliza uno el tiempo adecuadamente. Sin embargo, muchos de los canales de coloreado que hay actualmente ponen videos de entre una hora y hora y media para mostrar sus procesos de colorear. Así que haré uno dividido en tres o cuatro partes de 10 minutos para que vean el proceso que utilizo para colorear.

En cuanto tenga el video listo, haré menciones en las páginas de redes sociales para los que gusten verlos. Estos son los sitios:
Facebook: https://www.facebook.com/retratartetradicional/
Twitter: @chriskilue
Instagram: chriskilue
YouTube: https://youtu.be/BCJLZoarq6s

_________________________________________________________________________

Normally I dislike watching videos on YouTube that last more than twenty minutes. I think it is a waste of time. However, lots of the coloring channels on YT upload videos from one hour to one hour and a half to show their coloring process. So, I will create one that will be divided in three to four parts so you can see my coloring process.

As soon as I have part one of the video, I will announce them on social networks. These are the sites:

Facebook: https://www.facebook.com/retratartetradicional/
Twitter: @chriskilue
Instagram: chriskilue
YouTube: https://youtu.be/BCJLZoarq6s


domingo, 2 de octubre de 2016

Acentos en paletas de colores parte 2 / Accents in color palettes part 2

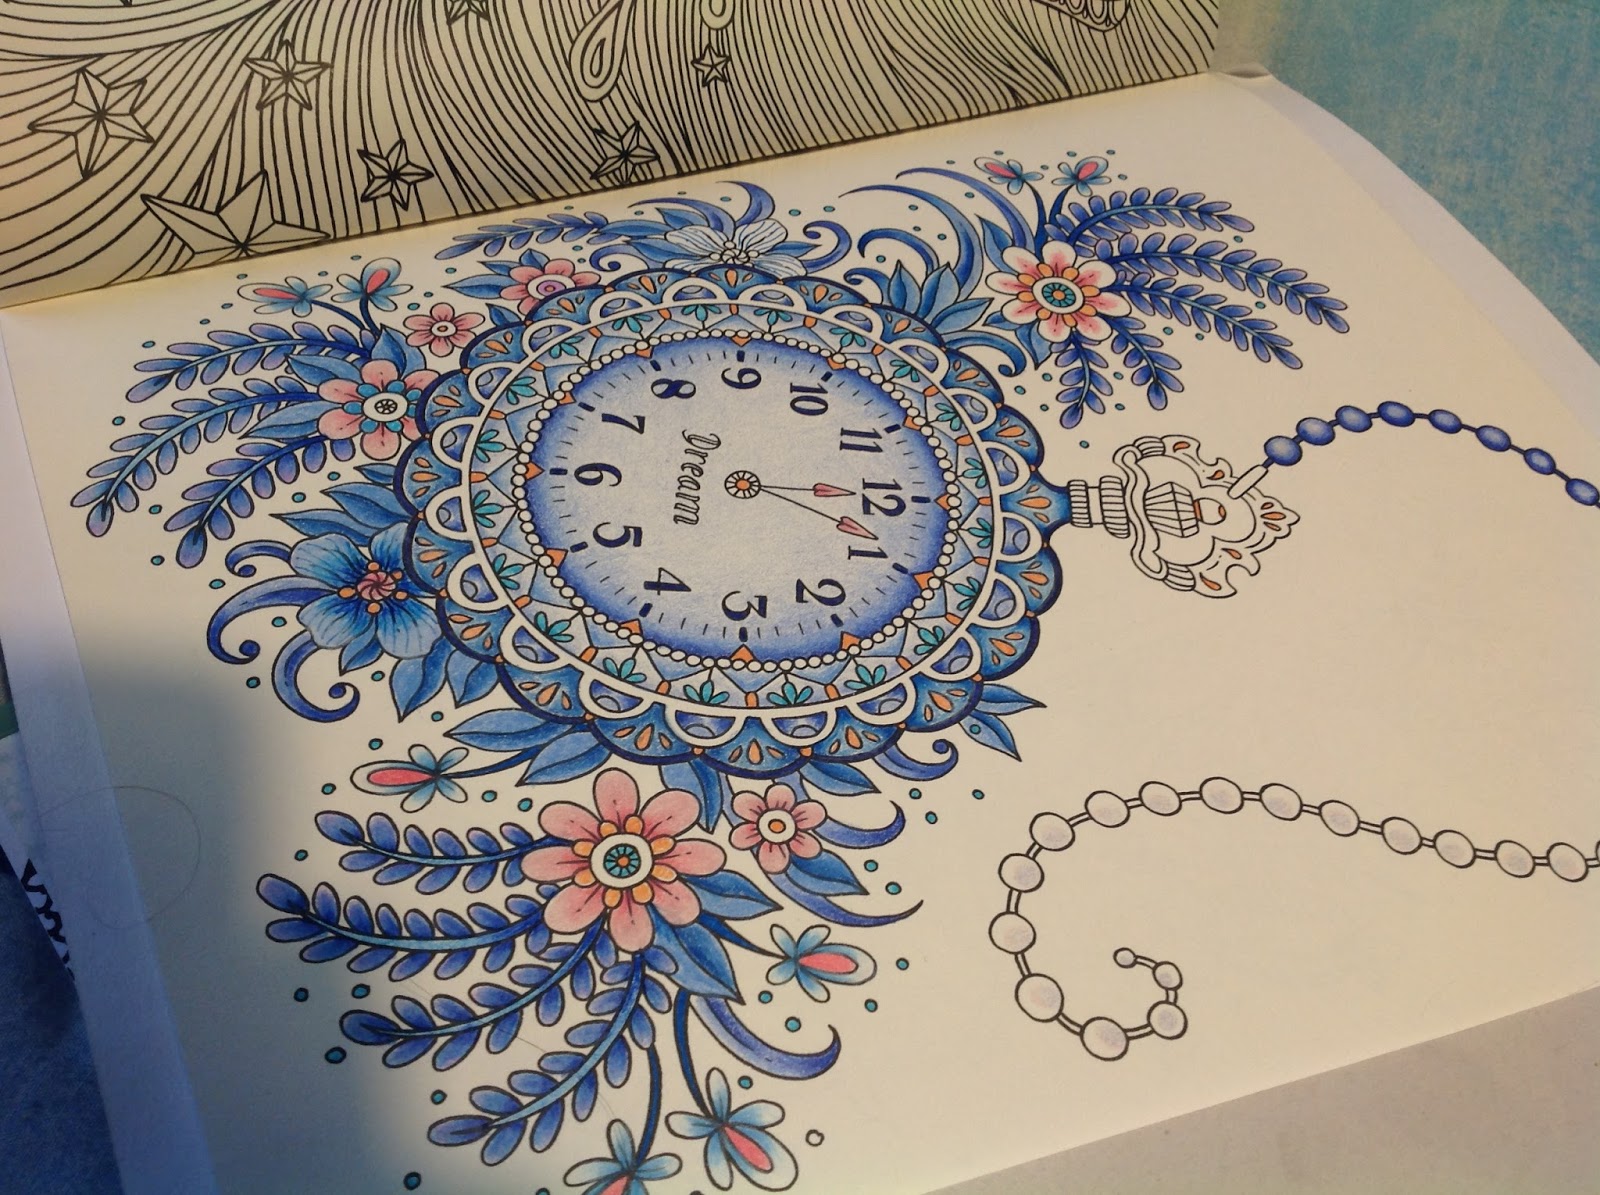
Como prometimos, esta es la segunda parte de elegir paletas de colores y trabajar con acentos de color. El dibujo elegido es del libro Summer Nights de Hanna Karlzon. Elegí el reloj de bolsillo para aplicar una bonita paleta de colores azul con acento rosa. Estos fueron los materiales:

As promised, this is the second part of how to choose colors and work with color accents. The chosen drawing is from the book Summer Nights by Hanna Karlzon. I chose the pocket watch to apply a beautiful palette of blue colors with a pink accent. These are the materials.


Mi proceso de dibujo es un tanto ecléctico, voy probando diferentes zonas y definiendo las zonas de acento de color en lo que voy trabajando. Tengo muchos años de experiencia coloreando por lo que es ya instintivo. La recomendación es que saques una fotocopia del dibujo a colorear y experimentes en esa zona antes de pasar al libro. 

Poco a poco se van trabajando las zonas, siempre con una presión suave y aplicando capas en sentidos opuestos para mantener uniformidad.

Mi drawing process is not methodical, I am testing different areas and definig the accent zones as I work. I have colored for a long time, so this is very intuitive for me. As a recommendation, you can make a copy of your drawing and experiment the materials there before moving on to the book.

Little by little the areas are covered in color with soft pressure and layering colors from different directions to keep it consistent. 


Los acentos van en lugares pequeños, o en un solo lugar para llevar la atención del espectador a cierta zona. En este caso el dibujo es muy detallado y se puso el rosa en lugares pequeños y en las flores. 

The accents go on tiny details, or just in one particular zone to get the viewer's attention to that area. In this case the drawing has a lot of detail, and pink was used in those details and the flowers. 


Con paciencia y dedicación puedes crear combinaciones hermosas sin otra herramienta más que una paleta de color que te guste. 

With patience and dedication, you can create beautiful combinations with a color palette you like.


Así que a tomar tus colores, buscar las paletas de color en Internet y a colorear se ha dicho.

So grab your colors, and find color palettes in the Internet to start working. 


domingo, 25 de septiembre de 2016

Dibujo con Bicolores / Bicoloured Drawing

Para empezar a colorear (sin frustrarte), no es necesario tener 150 colores (ni la inversión de dinero que eso significa). Lo primero es aprender a poner capas de color para crear nuevos colores y efectos.
Nada mejor que un bicolor azul/rojo para aprender lo anterior. Busca un simple lápiz bicolor en la papelería de la esquina (o en las grandes que los venden por paquete), y a practicar se ha dicho.

En mi canal de You Tube hay tres videos tutoriales al respecto. Puedes entrar al canal, siguiendo el menú a tu derecha.

Este dibujo es un ejemplo de lo que pueden lograr unos humildes bicolores:
El dibujo es de la artista australiana Peta Hewitt, quién me dio permiso para utilizarlo para este tutorial.


To start coloring without frustrating, it is not necessary to get a 150 color set (nor the money it is needed to invest in that). The first thing you need to learn is to create color layers to give effects, and of course create colors. The best thing to do is to get a bicoloured pencil (blue and red). Get one at your closer store and get ready to practice. 

On my You Tube channel there are three videos devoted to this bicoloured technique. You can access the channel using the menu on your right. 

This drawing is an example of what you can get by layering two colors. The line art is by Australian artist Peta Hewitt, who gave me permission to use it for this tutorial.